In the February issue of Outdoor Photography magazines Holiday & Courses guide, I give my tips for producing stunning black and white digital images.
I can remember developing a print from a black & white negative in a school art class – and this being a life changing moment. I was hooked, I knew what I wanted to be; a photographer. Printing was one of my passions when I was studying for my degree in photography many moons ago and loved the whole process of developing the black & white film and developing prints. I still miss this part of photography, but nowadays black & white digital photography can still retain its visual impact.
When leading photo tours and workshops I say to my guests, ‘See colour, think black & white as this adage has served me well over the years. It will extend your opportunities, especially when conditions don’t lend themselves to colour photography. Some locations work really well in black & white such as the Grand Canyon especially when there are moody, dramatic skies.
Some of the steps I use when producing digital black & white images include the following: Before taking the photograph, it is important to pre-visualise your result and it is also valuable to have a knowledge of the Zone System. Shoot in colour in RAW mode, colour space Adobe RGB.
You will have far more control over the finished result by photographing in colour and then making a black & white conversion using image processing software; my preferred one being Lightroom. Shoot on the lowest ISO possible. At high ISOs the noise (grain) is more evident; the lower the ISO the less noise. If you want to increase the grain on an image, it is best to add this in post production.
To process my images in Lightroom I do not use the basic develop module apart from maybe adding a little clarity. Instead I use the tone curve and develop the image to how I visualised it when I took the photograph.
There are many different digital print papers on the market, which have various feels and tones. This is similar to wet processed black & white prints, where each make of paper has a certain quality, along with the chemicals used in developing the print with any dodging or burning adding to the final look.
A favourite paper of mine used to be Kentmere Kentona paper, which had deep warm rich blacks with a warmer base white. To replicate the feel and look of this paper, for the digital photograph of the overgrown temple in Cambodia
in the develop mode of Lightroom I used the split tone function. This adds more depth and character to the finished result.
My photography holidays & courses to Cambodia, Angkor Wat, Vietnam, Marrakech the USA and the Gower, can be found on my holidays website http://www.digitalphotographyholidays.com Newsletter subscribers receive special offers throughout the year on my travel photography holidays and landscape photography workshops. SUBSCRIBE HERE
‘May the light be with you’
I can remember in an art class at school when we developed a print from a black and white negative, that was my life changing moment, I was hooked, I knew what I wanted to be, a photographer. Printing was one of my passions when I was studying for my degree in photography and loved the whole process of developing the black and white film and then making the prints. I still miss this part of photography, but guess nowadays black and white photography is much easier with software and has reduced the use of toxic chemicals.
I am a freelance travel and garden photographer and also run photography holidays, and on these I always say to my guests “See in colour, think black and white”. Black and white can often work better for you on even dull days or misty ones, such as this misty morning on Ha Long Bay.
I liked the different tones in this scene and knew it would work well as a black and white image. Pre-visualising your result is important and having a knowledge of the zone system is also valuable.
To produce digital black and white images these are some of the steps I use.
When taking the photograph shoot in colour and in RAW mode, colour space Adobe RGB. You will have far more control over the finished result photographing in colour and then making a black & white conversion using image processing software on your computer.
It is best to shoot on the lowest ISO possible when photographing for black & white images. At high ISO`s, noise (grain) is more evident, the lower the ISO the less noise. If you want to make the final image more grainy then it is best to add this afterwards in post production software such as Lightroom.
Having first visited Bagan in Myanmar (Burma) over 10 years ago for a shoot for National Geographic I fell in love with the place and it still remains one of my favourite places on the planet. There are over 4,000 temples dotted on the plains and the whole area has an ethereal, timeless feeling. I have been returning to Bagan ever since my first visit and have been working on a series of black and white images. I had already pre-visualised the set of black and white images of the temples and for this series I shot the originals in colour and converted them to black & white in Lightroom.
When you wet processed black and white prints, each make of paper would have a certain quality, feel and tone to them. A favourite of mine used to be Kentmere Bromide paper, which had rich neutral blacks, a brilliant base white and superb tonal rendition. I used to use this paper for selenium toned prints to produce a warm feel. To replicate this feel, in the develop mode of Lightroom I use the split tone function.
I produced a set of photographs of Bagan that won an award in the travel category of the International Photography Awards. If you are producing a series of photographs that will be seen together it’s best to keep the same tone for each print so they work well together.
In the develop mode of Lightroom, in the ‘tone curve’ you can alter the contrast of the photograph, much as you could with processing prints through choice of paper and processing. For the photograph above I adjusted the tone curve until I got the desired effect.
I tend not to use the main develop functions when producing a black and white image, apart from possibly a little clarity:
On a shoot at the Grand Canyon the light was truly working for me early one morning as the sun rose above the horizon. The shafts of sunlight through the moody clouds was a photographers dream.
Grand Canyon: Canon 24-70mm lens f16 1/20th sec – ISO 100
I also thought this would make a lovely black and white. For this photograph I wanted a Kentmere Kentona photographic paper feel which featured a chloro-bromide emulsion to give warm deep rich blacks and a warm white base. For the image below I again converted it to B&W in Lightroom, altered the tone curves and split toned the image.
In Cambodia I was wandering around a rural village saying hello to people in the Khmer language, when I came across this lady. She spoke back to me in Khmer and I replied back, much to her amusement. She called out all her family and got me to speak to them. They all found it funny that I was speaking their language, as they spoke no English. I was invited to their house to drink sugar palm water with them, which is highly prized, it has a lovely sweet and very earthy taste to it.
I was just about to ask if I could take some photos, when the lady had already pointed at my camera and stood up, I always find it amazing that thought always seems to have no language barriers. I took some photos of her and when she looked at them on the back of the camera she gave me the seal of approval. It is these chance encounters that really make me buzz when I am on a travel photography assignment as I love meeting the people of the country.
I was pleased with the portrait and decided to convert the photograph to black & white in Lightroom and again split toned the image.
I wanted a black and white image that this time had an old Ilford Galerie photographic paper feel.
This was done by processing in Lightroom and using the tone curve and split toning to the desired effect. In this image note it has a cooler feel to it, with a little more blue hue in the shadows..
To recap, for black & white images, start thinking in black and white. Shoot in colour in RAW mode on the lowest ISO possible, then convert the final image in the post production software of your choice.
Next time you visit a photography exhibition or gallery that is displaying old wet process photographic prints take a close look at them and see the differing tones and contrasts, if you are lucky they will also display which paper they were printed on. You can use this feel of wet process photographic paper in your own digital prints.
Nowadays there are many different digital print papers on the market, these have different feels and tones too. Fine art digital printing is an art in itself, you really need a fully colour calibrated, controlled digital workflow to achieve the best results. Experiment, have fun and if you are producing black and whites for the web then try some of the techniques above, I’d love to see them.
I run travel and landscape photography holidays and tours in Burma, Cambodia and Vietnam.
I also run landscape photography workshops and weekends in the Gower, Wales and Bluebell woods photography workshops in Gloucestershire, please visit the website for full itineraries and information:www.digitalphotographyholidays.com
Newsletter subscribers receive special offers throughout the year on my travel photography holidays and landscape photography workshops, you can subscribe here
Travellers Choice on Trip Advisor has voted Marrakech the top destination in the world to visit .
Marrakech, Jemaa el Fna sunset
It is easy to see why, just 3 hours flight from the UK and you are transported to a city that for me, as a travel and garden photographer, has such a rich tapestry to photograph. No visit to Marrakech is complete without a visit to the main Jemaa el Fna square, a cocophony of noise from snake charmers to drummers with the smell of spices and food being cooked for locals and visitors from far and wide.
One of my favourite street food stalls in Jemaa el Fna is Chez Hassan, number 32. You can’t miss it, just look for the one creating the most steam and smoke as the best Merguez sausages in town sizzle on the griddle, be patient as it’s hard to get a seat as this is a firm favourite with the locals.
Chez Hassan, number 32
Of course there is much more to Marrakech than the main square. The nearby Koutoubia mosque dominates the skyline and is a favourite location of mine for photography.
Woman walking in front of the Koutoubia mosque
The souks and narrow winding alleyways of the old Medina always come up with travel photography gems. Getting to find your way around can be very tricky, fortunately after photographing here over the years I know my way around the maze like labyrinthian narrow streets.
Man with donkey cart, old Medina, Marrakech
There are so many great backdrops for photographs in the old Medina. I am always on the lookout for a good background for a photograph. One of the skills of travel photography is to observe the movement of people in a particular location and see when the best light hits the scene. Once you have found a location with good light and movement of people, a trick I employ is to frame my scene with the camera on a tripod with a remote shutter release. When a person comes through the scene I’ve framed they don’t have the same reaction as if I had the camera up to my eye. I tend to even look away when they appear as if I’m not even taking a photograph, it’s a trick that works for me, resulting in natural looking images with people.
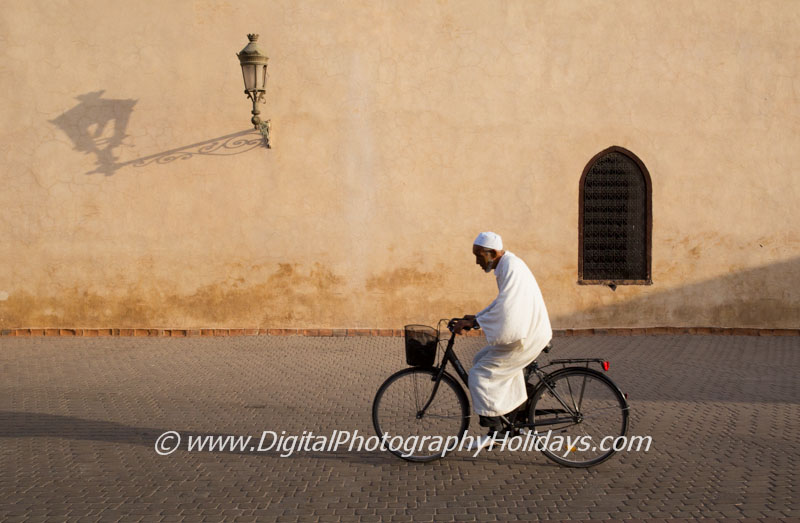
Cyclist in the old quarter of Marrakech
In the old Medina I love the crumbling coloured walls, there always seems to be a good prop set against them.
Bicycle, Medina
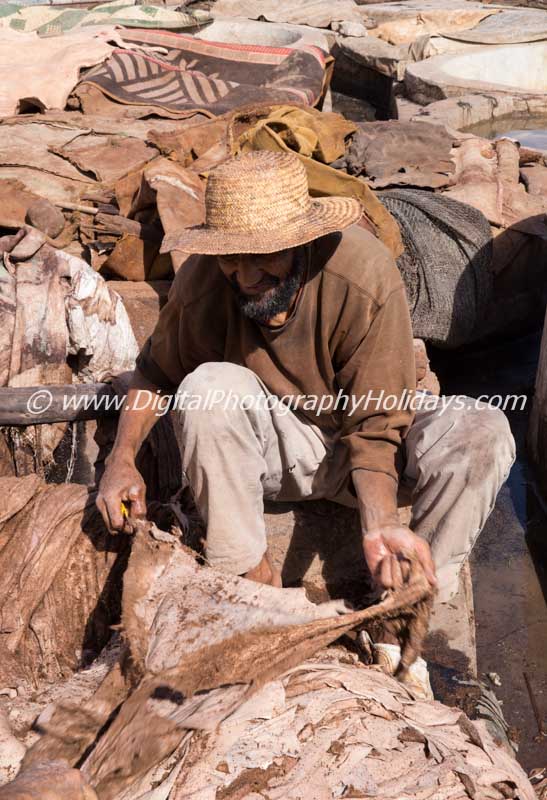
The Medina is home to many artisans located in their own areas. The tannery district is only for those that can bear the stench, but a fascinating place to photograph.
Tannery district
Other favourite areas are the wool dyers district.
Wool dyers district
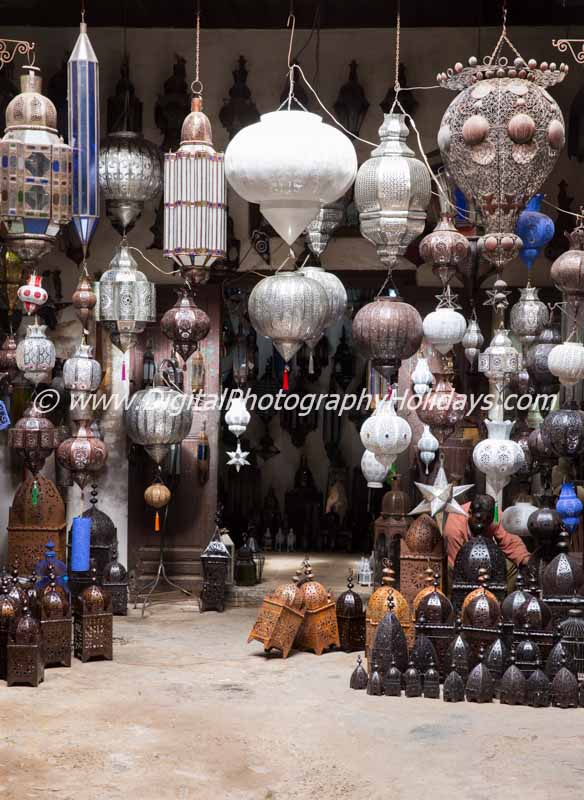
and the metal work district.
Metal workers district
If you are in this area be sure to check out the Museum of Photography to see some amazing photography from Morocco spanning a number of decades. The place also has a great rooftop café with views over the sprawling city and Atlas mountains.
A great escape from the hustle and bustle of the old Medina is to go and visit the iconic Jardin Majorelle, a feast for the lens with its cobalt blue walls, colourful containers and collections of cacti and bamboos. The garden was restored by Yves Saint Laurent and there is a memorial to him in the garden.
Jardin Majorelle – Yves Saint Laurent garden
Spend some time here, there is plenty to photograph, you can also get one of the best Moroccan breakfasts in Marrakech in the courtyard garden.
Jardin Majorelle, ‘Kalanchoe Beharensis’
Be sure to look out for those hidden corners too.
Jardin Majorelle
If you want to escape the city altogether the Atlas mountains are only a short distance away with its Berber villages and slower pace of life.
Atlas mountainsAtlas mountains
Back in Marrakech there are numerous souks to get lost in, my favourite is the spices souk.
Spices souk
It’s worth while weaving your way around the maze like souk to see what you stumble upon.
Marrakech Souk
I love exploring the quieter areas off the beaten track, you just never know what you are going to encounter around each corner.
Marrakech man in traditional djellaba and fez hat
Other places of interest for photography are the various Palaces and the Ben Youssef Madrasa, a favourite place with my guests on the travel photography city break I run there each year.
Ben Youssef Madrasa
An alluring appeal that keeps me coming back to Marrakech is the light and the African sunsets you get there. Perch yourself on one of the numerous cafes in the main square, get yourself a Moroccan mint tea and a tajine, watch the place come alive as the sun sets, and enjoy the feast for all the senses. Yes the billowing smoke you can see in the shot below is coming from Chez Hassan.
Jemaa el Fna and Koutoubia mosque, sunset
You can join me on a 5 day travel photography city break to Marrakech in September 2016, with an optional photography excursion up in to the Atlas mountains where we have a traditional Berber lunch on my Berber friend CoCo’s roof terrace.
Newsletter subscribers receive special offers throughout the year on my travel photography holiday and landscape photography workshops, you can subscribe here
The International Garden Photographer of the Year awards have just been announced, I was Commended in the Beautiful Gardens category for this shot of Jardin Majorelle in Marrakech, Morocco.
Morocco, Marrakech, Jardin Majorelle (Yves Saint Laurent Garden)
I visited the garden a number of times as I was in Marrakech 10 days early before guests turned up for a photography city break I run there. The garden is a photographers dream with its bold colours and planting. The cobalt blue walls are a great backdrop to any plants in pots. The plant in this pot was just catching some sunlight giving depth to the composition.
I also converted it to black and white, and was going to send this one instead as I liked the simplicity of the shot.
Which one do you prefer?
I was also Highly Commended in the Monochrome category for this shot of Chitting Potatoes.
Chitting Potatoes
This was taken with my 100mm Canon macro lens, shot in a north facing window in natural light. It was the two shoots that caught my eye as they looked like weird alien cartoon characters. Even from the simplest of subjects you can find something to photograph with the macro lens.
Congratulations to Magdalena Wasiczek for her overall winning shot: The Ballerinas
To see all the awards for this year follow this link
The International Garden Photographer of the Year awards have just been announced.
‘Sarracenia Flava’: Finalist, Macro Art
For the shot I wanted to give the plant an air of mystery and a fine art feel. I decided to minimise the depth of field and only focus on the nearest part of the plant to the lens. By doing this it would knock all the rest of the plant out of focus. The lighting was chosen to only have the highlight at the nearest point to the lens leaving the rest of the photo to fade into shadow, which gives the air of mystery.
Finally I converted the image to black and white and then split toned the colour in Lightroom.
The photograph was shot with a 180mm Canon macro lens, at f8 with 0.5sec shutter speed at 100 ISO.
‘Watering my allotment’: Commended, Plants & Water, photographed on my allotment Old Bisley Road, Stroud.
The photograph was first taken to illustrate a review I did for the Manfrotto Pixi tripod
I had pre-visualised the shot using the mini tripod as I thought it would be able to get to places I couldn`t, in amongst my bean, pumpkin and sweetcorn bed on the allotment. The summer of 2013 in the UK had been a particularly long and dry one and watering became a routine part of visits to the allotment in order to keep my plants alive.
I was after a shot that would convey the feeling of warmth, heat and watering. I chose an evening when the sun was low in the sky, placed the tripod amongst the veg and shot the photo into the sun for a more contemporary feel to the image.
With a cable release I tried a couple of test shots to get the exposure spot on (this can be tricky when shooting straight into the sun.) Then I watered the veg with my watering can, the result I was really pleased with, not only had the Pixi tripod held my very weighty Canon 1Ds Mark II but the streaks of bright backlit water added a beautiful pattern to the resulting image. The only problem I encountered was keeping the water off the camera, which was ironic after such a long hot dry summer.
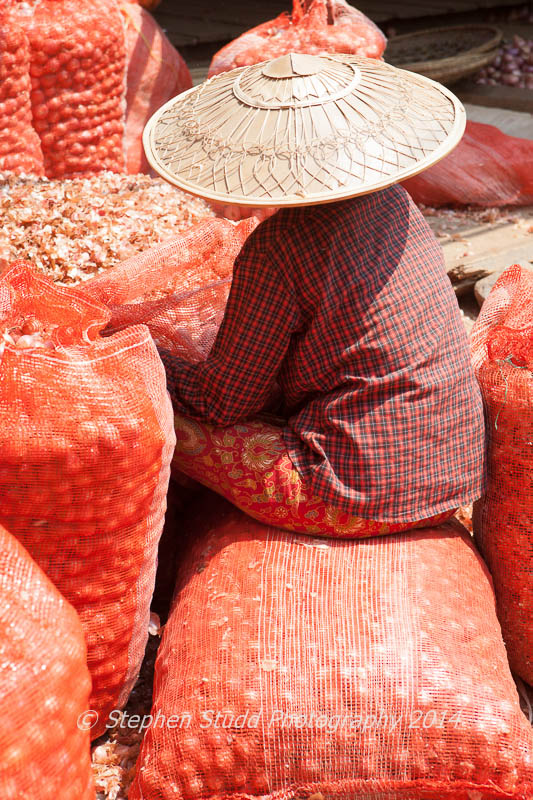
Woman at the Market, Mandalay, Myanmar (Burma): Highly Commended, Bountiful Earth
This image is one of my crossover images, in that I am a travel & garden photographer. I was away on a travel shoot in Burma, whilst also looking for great locations for the photography holidays I run there. Markets are always a great place to visit in any country, especially for travel photography. I had in my mind some of the different categories for IGPOTY and Bountiful Earth was an obvious one at this market in Mandalay. The woman with the bamboo hat, the colours of the scene and the big bags of shallots drew my attention. The market in Mandalay was full of fresh produce and a photographers dream, a place I visited over several days.
Canon EOS 1DS Mark II 70mm f6.3 1/160th sec, 100 ISO
The International Photography Awards 2013 have just been announced and I received an Honourable mention in 8 categories, which I am really pleased with as there were over 15,000 entries from around the world.
Some of you might have seen my Myanmar (Burma) photographs when they first appeared on the Manfrotto website.
Travel and Tourism category and Fine Art; Landscapes category “Temples of Bagan”
Having first visited Bagan eight years ago, on my return visit in April of this year I had already pre-visualised a series of black and white images of the temples. There are over 4,000 temples on the plains of Bagan and the whole area has an ethereal, timeless feeling and is one of my favourite places on the planet. For the series I converted my images to black & white, then split toned them in Lightroom. It was important to have the same tone in the series as I wanted them to work together. These 3 photographs were the ones I entered.
Myanmar (Burma) “Temples of Bagan”Myanmar (Burma) Temples of BaganMyanmar (Burma) “Temples of Bagan”
Panoramic category “Temples of Bagan”
For this image I wanted to show a panoramic view from one of my favourite temples, from which you get an idea of what the stupa studded landscape looks like.
Myanmar (Burma) “Temples of Bagan” Panoramic
Culture Category “Stonemasons Burma”
In Mandalay there is an area of the city where images of Buddha are carved from rock. I spent a morning in this area photographing the many processes that are undergone to make the statues. The air was filled with rock dust and it was quite oppressive in the searing heat of April in Mandalay. The boy to the left has to stand there applying water to where the man is drilling. This photograph was just one from a whole series shot that morning.
Stonemasons Burma
Fisherman Inle Lake
Lake Inle in the Shan State of Myanmar covers an area of 45 square miles (116 km2) and is at an altitude of 2900 feet, it is home to the leg rowing fisherman. It was my first visit to the lake and it came as a welcome relief to the heat of Mandalay in April as the air was much cooler. I was really taken by the beauty of the place and chartered a boat to take me out for a few days. On my first dawn outing the boat captain drove past this fisherman who was completely oblivious to us. The sun had just appeared over the hills which made for a great silhouette and some warmth after a chilly start. I often see photographs of the Inle Lake fisherman which are over posed, I liked the natural feeling to this shot.
“Lake Inle fisherman”
Travel & Tourism Category; People of Burma
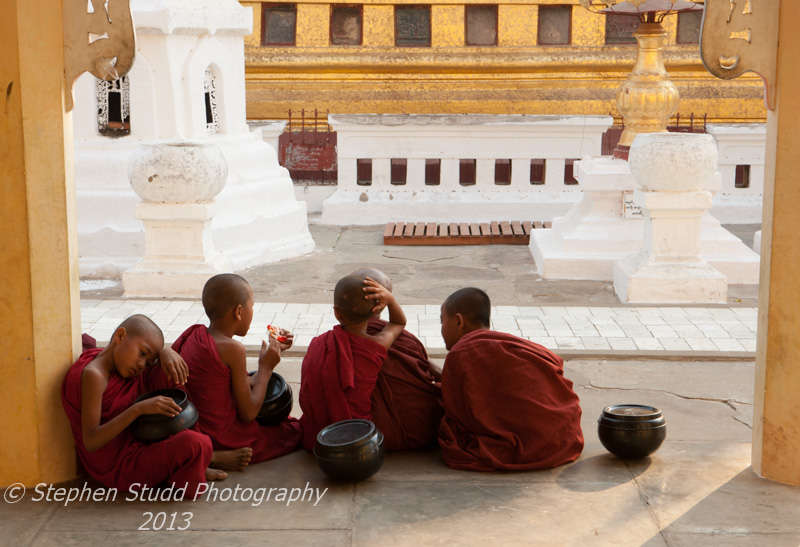
Mandalay U Bein BridgeMandalay StonemasonsYoung Monks Nyaung ShweInle lake, Myanmar (Burma)
Trees Category; “Tree Roots; Ta Prohm Temple, Cambodia”
This shot is one from an ongoing project photographing nature`s strength over humankind at the temples of Angkor Wat. The trees roots of this tree are slowly pulling the temple apart returning the stone back to the Earth and creating a new form of beauty.
Tree Roots; Ta Prohm Temple, Cambodia
Flowers category; Iris
This image of the Iris was taken with my 180mm macro lens which is my favourite lens for close up photography. The Iris was slightly back lit from the sun which showed off its translucent petals.
Iris
I am looking forward to returning to Cambodia and Burma this winter as I host travel photography holidays to my favourite locations www.digitalphotographyholidays.com
“I`m after something fresh, light, fun and airy that shows movement, with photographs that stand out, to refresh the old ones on my website” was the brief. After a discussion with Helene I found out she wanted a contemporary feel and also some approachable portraits to revamp her yoga dance website.
This set my mind racing as yoga dance was a subject I have not shot before, though I love these type of shoots where a client phones up and we just go from there. I arranged for the shoot to be near sunset at a location I had chosen on a clear evening and I had pre-visualised some of the shots with Helene leaping off the Earth.
Helene was a great person to work with as she was really willing to try out our ideas for the shots.
Low angle views shot against the sun with lots of flare gave a very contemporary feel.
We had a very limited time with the sun setting quickly and I wanted to make use of that lovely warm light, here in the UK you cannot guarantee it will be there the next few days.
Helene needed shots of her taken during yoga moves,
I really enjoyed this photo shoot as it was great fun and Helene was extremely pleased with the images when I sent them to her.
This image of the carnivorous plant Sarracenia Flava var Maxima, all green form pitcher plant was a finalist in the International Garden photographer of the Year, monochrome art category.
For the shot I wanted to give the plant an air of mystery and a fine art feel. I decided to minimise the depth of field and only focus on the nearest part of the plant to the lens. By doing this it would knock all the rest of the plant out of focus. The lighting was chosen to only have the highlight at the nearest point to the lens leaving the rest of the photo to fade into shadow, which gives the air of mystery.
Finally I converted the image to black and white and then split toned the colour in Lightroom.
The photography was shot with a 180mm Canon macro lens, at f8 with 0.5sec shutter speed and 100 ISO.


